If you’ve been in the backend world for a while, you’ve probably heard the word “Kafka” thrown around in system design interviews, architecture meetings, or that one senior dev’s Slack message. I remember the first time I came across it – I thought, “Another tool? Really?” But once I actually sat down and understood what Kafka does, it genuinely changed how I think about building systems at scale.
🧑💻⏳ Getting Started with Apache Kafka – Introduction & Core Concepts 💥 🚀
So in this post, I’m going to break down Apache Kafka from scratch – no fluff, no overly academic language. Just practical, clear concepts you can actually use.
1. What is Apache Kafka?
Apache Kafka is an open-source distributed event streaming platform. In simple terms, it’s a system that lets different parts of your application talk to each other by sending and receiving messages – but at a massive, real-time scale.
A Brief History of Apache Kafka
Before we dive into the technical side, it’s worth knowing where Kafka came from – because the story behind it actually explains why it works the way it does.
Back around 2010, a team at LinkedIn was facing a serious problem: they needed a way to ingest large amounts of event data from the LinkedIn website and infrastructure in real time – and nothing available at the time could handle it properly. Traditional messaging systems like ActiveMQ and RabbitMQ were built for different use cases. They had great delivery guarantees but couldn’t scale the way LinkedIn needed.
So in 2010, Jay Kreps, Neha Narkhede, and Jun Rao – three engineers working at LinkedIn – set out to build something new. Kafka became an open-source platform in early 2011. By that point it was already ingesting over a billion events per day inside LinkedIn alone.
Interestingly, Jay Kreps named it after the author Franz Kafka because it is “a system optimised for writing” – and he simply liked Kafka’s work. A small detail, but one that makes the name stick.
After rapid growth and interest from the open-source community, Kafka graduated from the Apache Incubator to become a Top-Level Project under the Apache Software Foundation – opening the doors for global community contributions.
In 2014, the three Kafka founders left LinkedIn to establish Confluent – a cloud-native platform with Kafka at its core, aimed at making it easier for organisations to manage and deploy Kafka at scale. Today, Confluent remains the primary commercial force behind Kafka’s enterprise ecosystem.
Fast forward to today – Kafka is used by Netflix, Uber, Airbnb, Twitter, Goldman Sachs, and thousands of other companies to power their real-time data infrastructure. It has gone from solving one company’s internal logging problem to becomingthe global standard for event streaming.
Think of Kafka as a smart, durable message highway between your services.
2. Why Kafka? (The Problem It Solves)
Imagine you have 10 microservices. Each one needs data from the others. Without something like Kafka, you’d end up with a messy web of direct API calls – every service calling every other service. It’s a nightmare to maintain, and one failure can cascade everywhere.
Kafka solves this with a simple idea: instead of services talking directly to each other, they publish events to Kafka, and other services subscribe to those events. This is called the pub/sub model (publish/subscribe).
Benefits you’ll immediately notice:
- Services are loosely coupled – they don’t need to know about each other
- You get fault tolerance – if one consumer is down, it can catch up later
- It handles high throughput – millions of messages per second
- It acts as a buffer – producers and consumers work at their own pace
3. Core Concepts You Must Know
Before you write a single line of code, these terms need to click in your head.
Topics & Partitions
A topic is basically a category or feed name. When a service sends a message, it sends it to a specific topic. Think of it like a YouTube channel – producers upload to it, consumers subscribe to it.
A partition is how Kafka splits a topic for parallelism. One topic can have multiple partitions, and each partition is an ordered, immutable log of messages. More partitions = more parallelism = better throughput.
Producers & Consumers
- A Producer is any application that sends (publishes) messages to a Kafka topic.
- A Consumer is any application that reads (subscribes to) messages from a topic.
Simple enough, right?
Consumer Groups
Here’s where it gets interesting. Multiple consumers can work together as a Consumer Group. Kafka distributes the partitions among group members, so each partition is consumed by only one consumer in the group at a time. This enables parallel processing without duplicate work.
Brokers & Clusters
A broker is just a Kafka server. It stores messages and serves them to consumers. A cluster is a group of brokers working together. Most production setups have 3+ brokers for redundancy.
Offsets
Kafka tracks where a consumer is in a partition using an offset – a simple integer that acts like a bookmark. Consumers can even replay old messages by resetting their offset. This is huge for debugging and recovery.
Zookeeper vs. KRaft
Older versions of Kafka relied on Apache ZooKeeper to manage cluster metadata. But as of Kafka 2.8+, there’s a new built-in mode called KRaft (Kafka Raft) that removes the ZooKeeper dependency entirely. For new setups, use KRaft – it’s simpler and more performant.
4. Kafka Architecture: How Messages Actually Flow
Here’s what happens when your app sends a message:
- Your Producer sends a message to a Topic
- Kafka’s Broker receives it and writes it to the appropriate Partition
- The message is replicated to other brokers for fault tolerance
- A Consumer in a Consumer Group polls the broker and reads the message using its Offset
- The consumer processes it and commits the offset
One important thing – Kafka doesn’t delete messages after they’re consumed. Messages are retained based on a retention policy (e.g., 7 days or 1GB per partition). This means multiple consumers can read the same message independently, and you can replay events whenever needed.
5. Setting Up Kafka Locally & Writing Your First Kafka App (Node.js)
Let’s get your hands dirty. The easiest way to run Kafka locally is with Docker – no complex installations, no manual configuration. Just a single command and you’re up.
Prerequisites
- Docker & Docker Compose installed
- Basic terminal knowledge
- Node.js installed on your machine
Step 1 – Create a Project Folder
Start by creating a new folder for your project. I named mine karka-starter.
Step 2 – Open the Folder in Your IDE
Open the folder in your preferred coding IDE. I’m using IntelliJ IDEA by JetBrains – feel free to use VS Code or any editor you’re comfortable with.
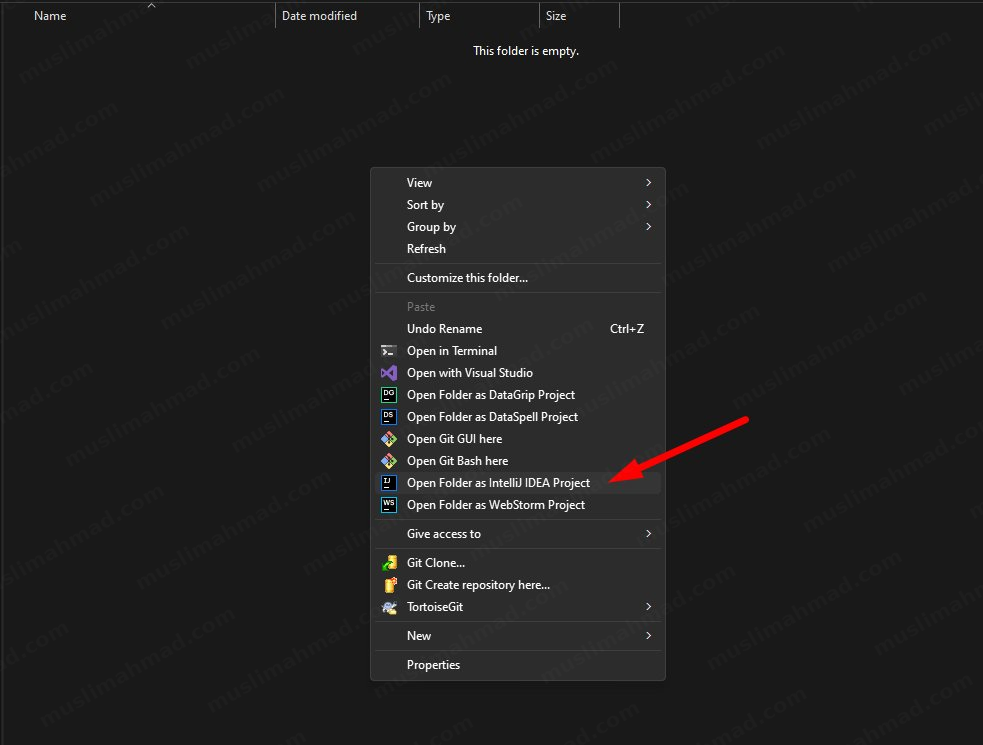
Once you open it, you’ll see the IntelliJ IDEA startup window like this:

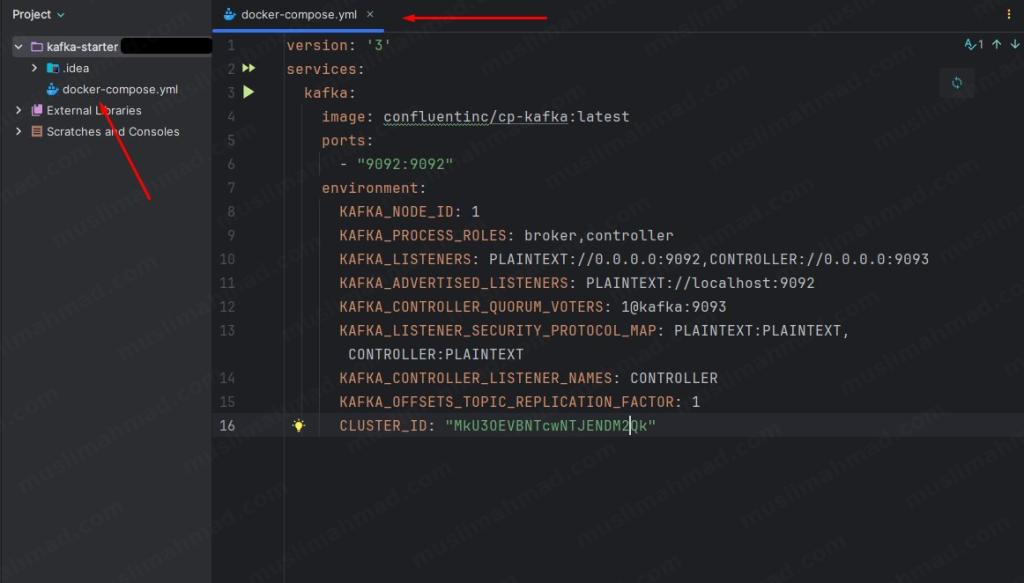
Step 3 – Create the Docker Compose File
Inside your project, create a new file and name it docker-compose.yml.
Right-click on the project folder → New → File:
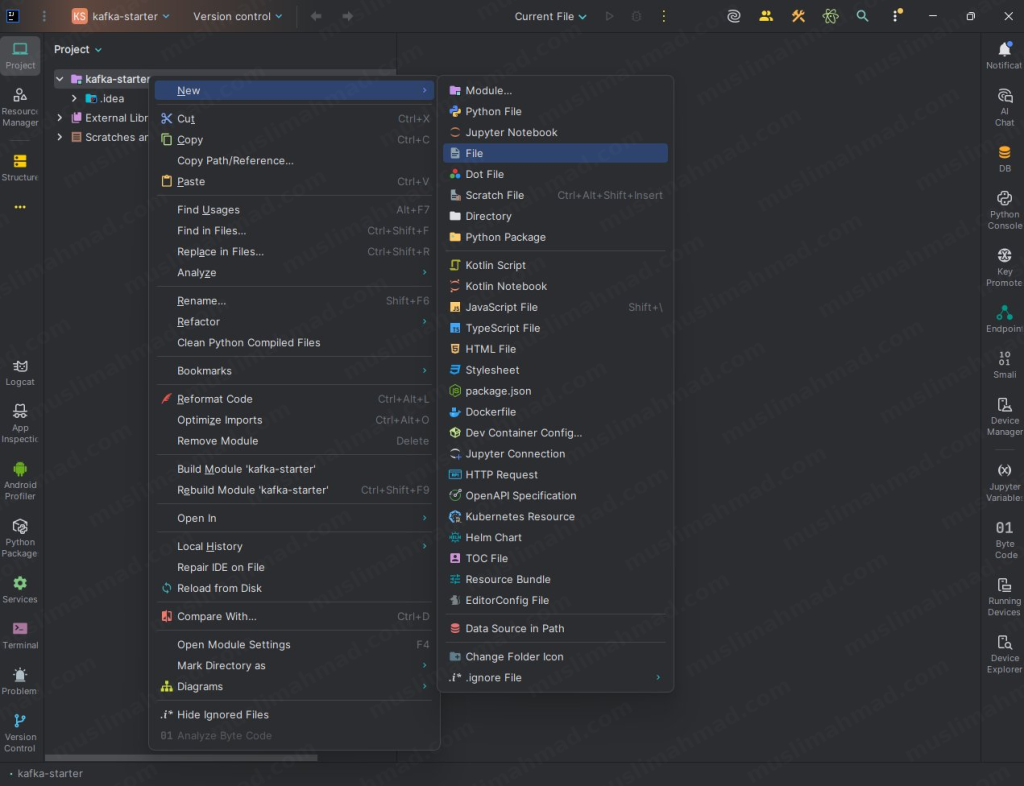
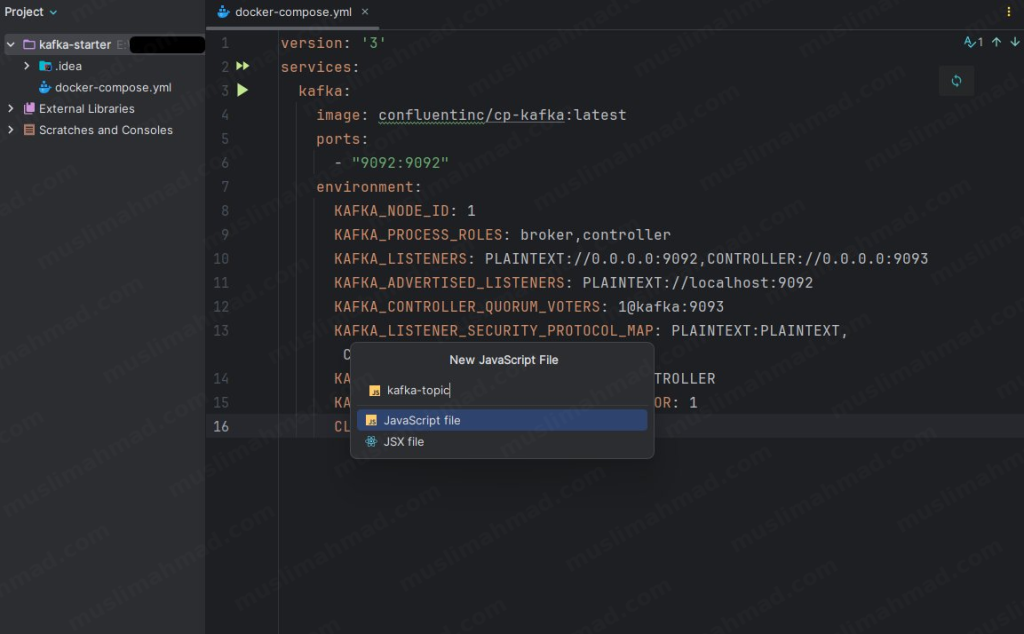
Type the filename docker-compose.yml and hit Enter:
Now paste the following configuration into the file:
version: '3'
services:
  kafka:
    image: confluentinc/cp-kafka:latest
    ports:
      - "9092:9092"
    environment:
      KAFKA_NODE_ID: 1
      KAFKA_PROCESS_ROLES: broker,controller
      KAFKA_LISTENERS: PLAINTEXT://0.0.0.0:9092,CONTROLLER://0.0.0.0:9093
      KAFKA_ADVERTISED_LISTENERS: PLAINTEXT://localhost:9092
      KAFKA_CONTROLLER_QUORUM_VOTERS: 1@kafka:9093
      KAFKA_LISTENER_SECURITY_PROTOCOL_MAP: PLAINTEXT:PLAINTEXT,CONTROLLER:PLAINTEXT
      KAFKA_CONTROLLER_LISTENER_NAMES: CONTROLLER
      KAFKA_OFFSETS_TOPIC_REPLICATION_FACTOR: 1
      CLUSTER_ID: "MkU3OEVBNTcwNTJENDM2Qk"
Your file should look like this after pasting:
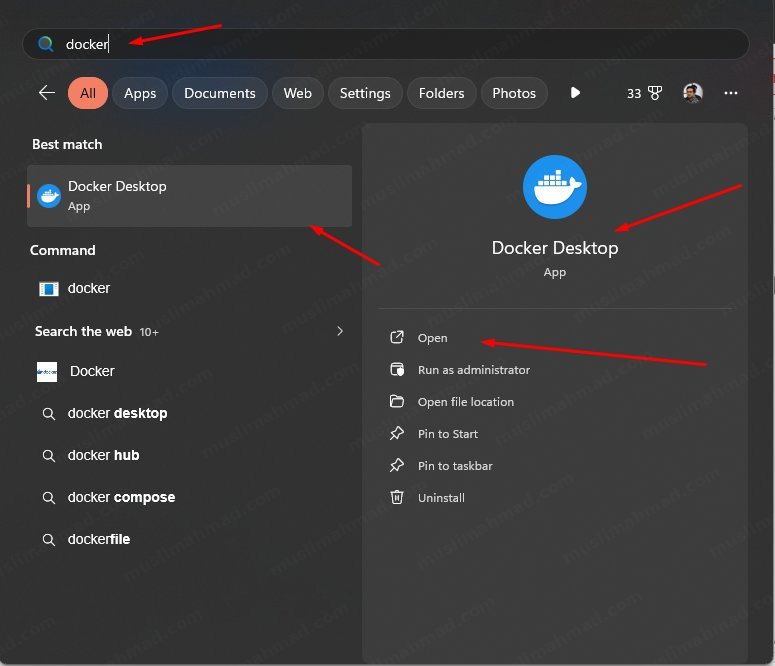
Step 4 – Start Docker & Run Kafka
Before running any command, make sure Docker Desktop is running on your machine. Search for it in Windows and open it:
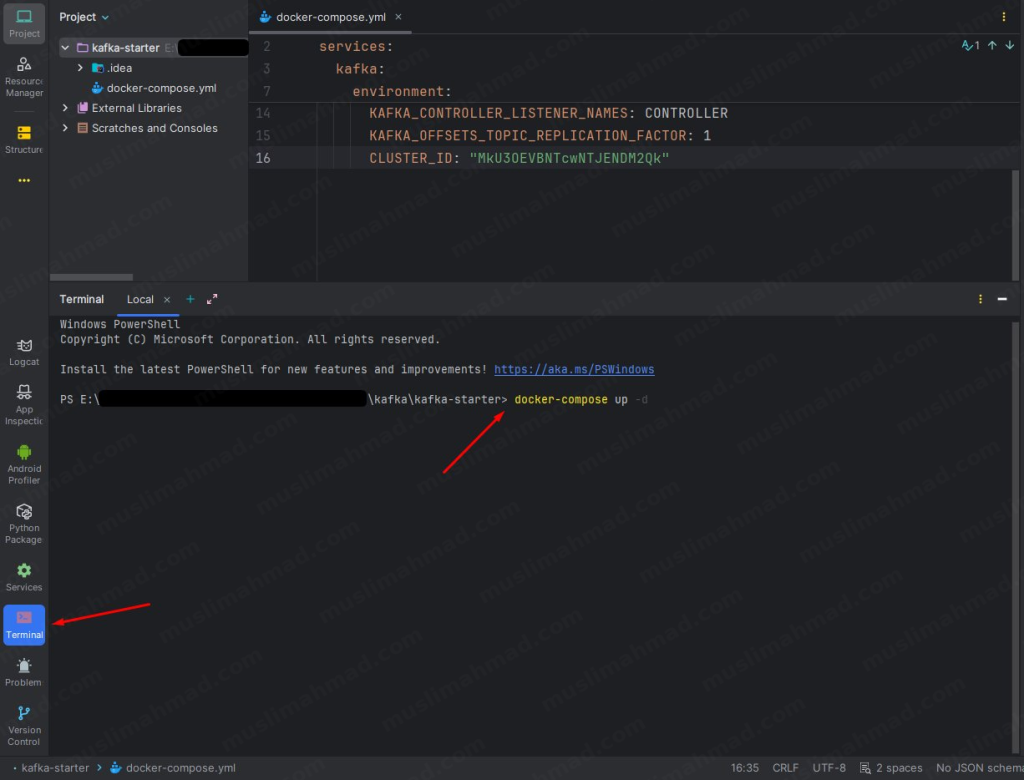
Now open your terminal. You can use the Windows PowerShell, Command Prompt, or the built-in terminal in your IDE – all work fine.
Navigate to your project folder and run:
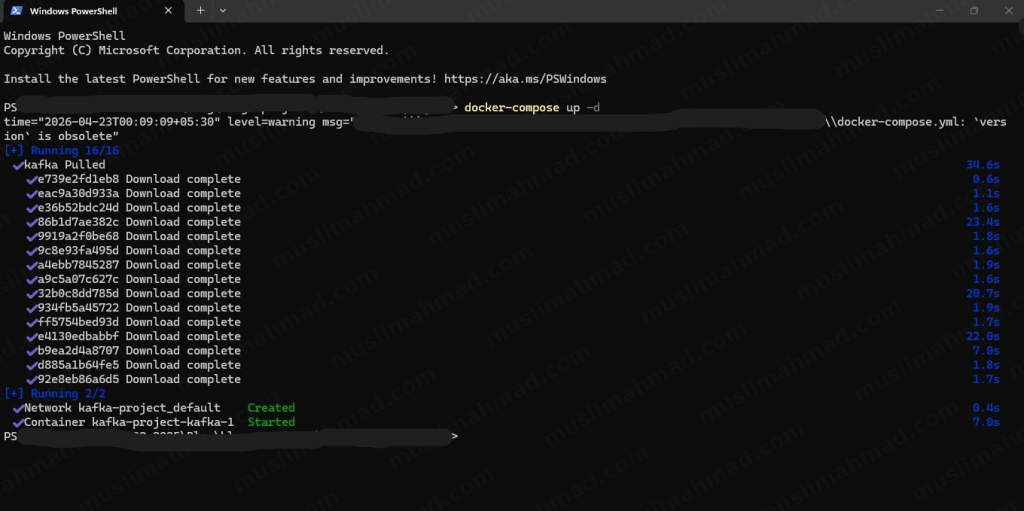
docker-compose up -d
You’ll see Docker pulling the Kafka image and setting everything up. This only takes a few minutes the first time:
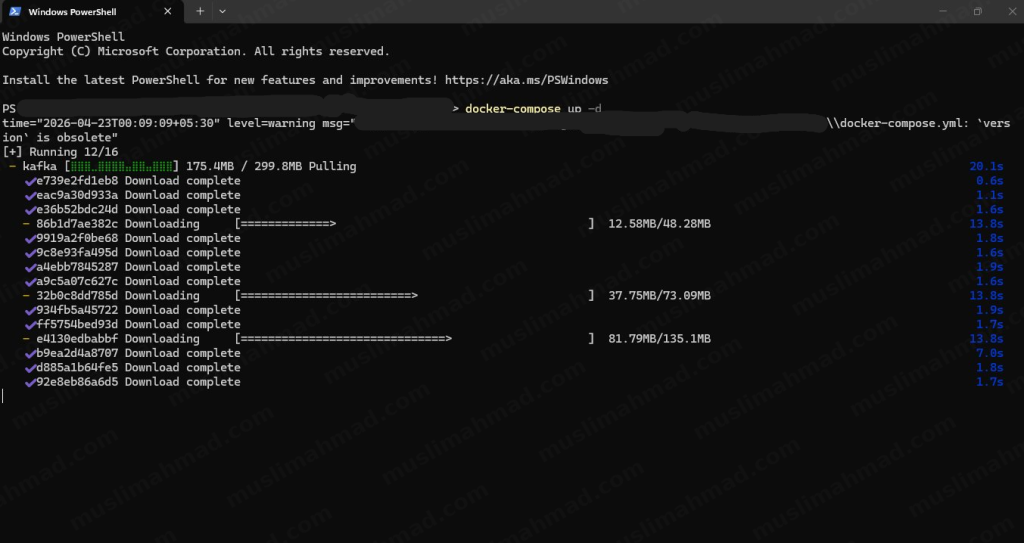
Once all layers are downloaded and the container starts, you’ll see a confirmation like this:
If you prefer using the terminal directly inside your IDE, you can do it from there too – it works exactly the same way:
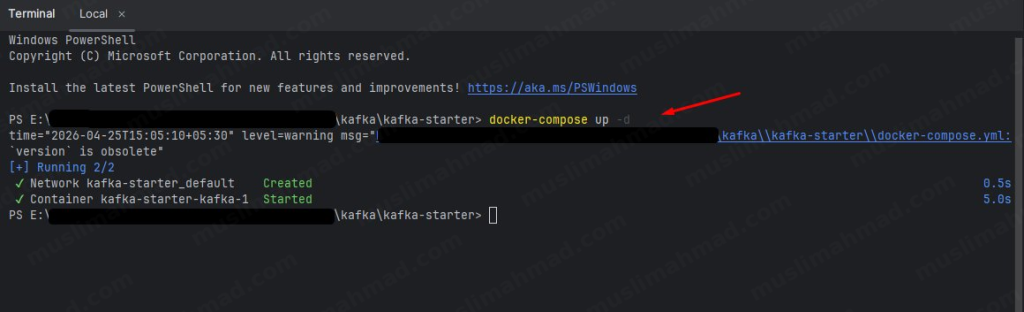
You should see Container kafka-starter-kafka-1 Started – that means your Kafka broker is now running on localhost:9092. 🎉
Step 5 – Initialize the Node.js Project & Install KafkaJS
We’ll use the popular kafkajs library to interact with Kafka from Node.js.
First, initialize a new npm project inside your folder:
npm init -y
Then install the KafkaJS library:
npm install kafkajs
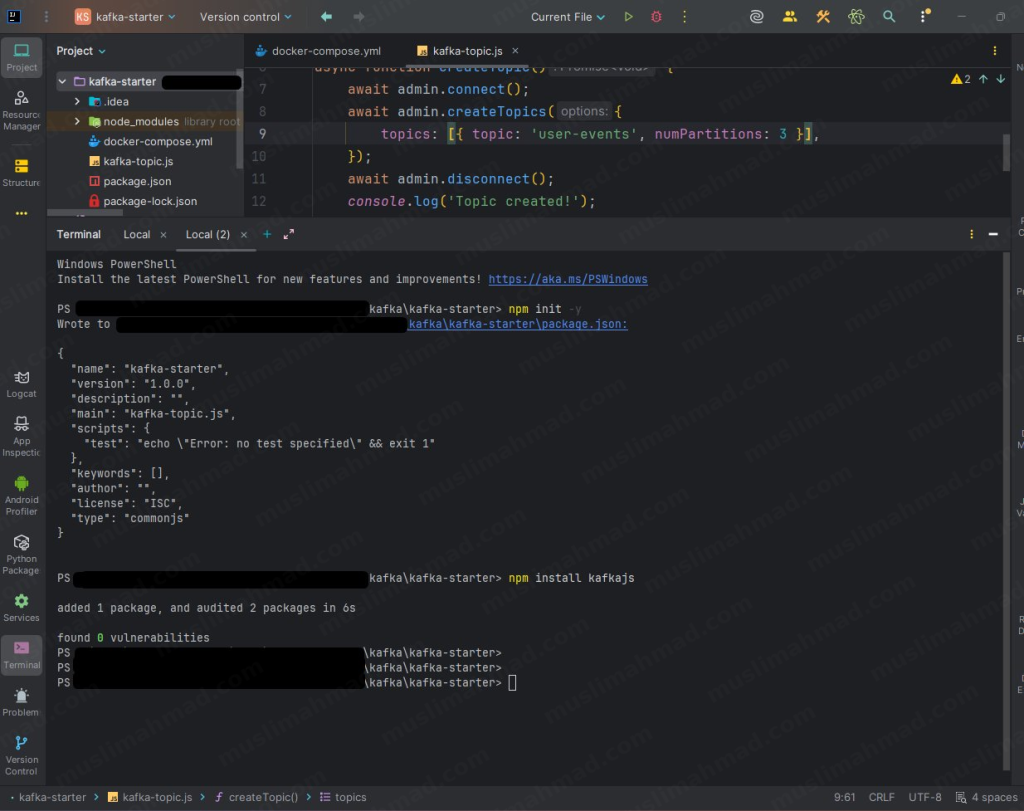
That’s your environment ready – Kafka is running in Docker and KafkaJS is installed in your Node.js project.
Step 6 – Create the Topic File
Create a new JavaScript file called kafka-topic.js:
Paste the following code into it:
const { Kafka } = require('kafkajs');

const kafka = new Kafka({ clientId: 'my-app', brokers: ['localhost:9092'] });
const admin = kafka.admin();

async function createTopic() {
  await admin.connect();
  await admin.createTopics({
    topics: [{ topic: 'user-events', numPartitions: 3 }],
  });
  await admin.disconnect();
  console.log('Topic created!');
}

createTopic();
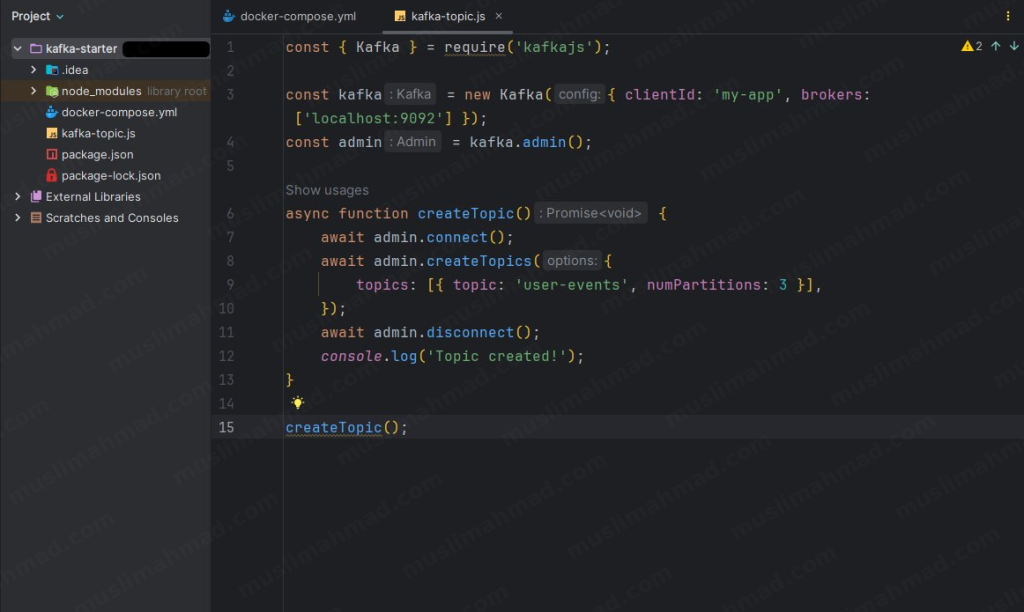
This file connects to your Kafka broker and creates a topic called user-events with 3 partitions.
Step 7 – Build the Producer
Create another file called kafka-producer.js and add the following code:
const { Kafka, Partitioners } = require('kafkajs');

const kafka = new Kafka({ clientId: 'my-app', brokers: ['localhost:9092'] });
const producer = kafka.producer({
    createPartitioner: Partitioners.LegacyPartitioner
});

async function sendMessage() {
  await producer.connect();
  await producer.send({
    topic: 'user-events',
    messages: [
      { key: 'user-1', value: JSON.stringify({ event: 'signup', userId: 'user-1' }) },
    ],
  });
  await producer.disconnect();
  console.log('Message sent!');
}

sendMessage();
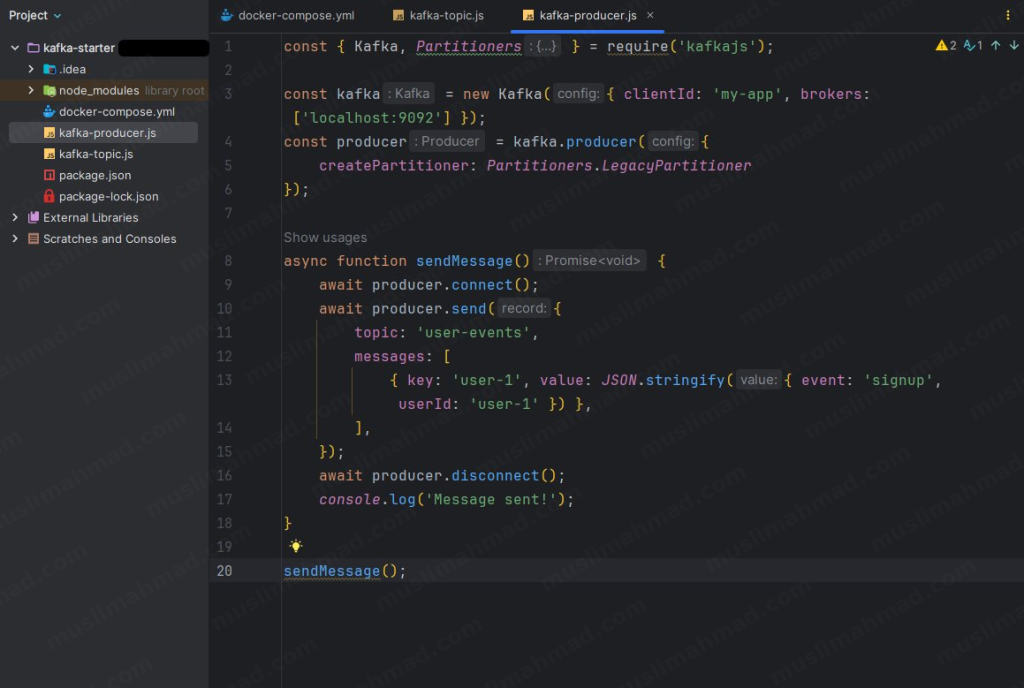
The producer connects to Kafka and sends an event – in this case, a user signup event – to the user-events topic.
Step 8 – Build the Consumer
Create one more file called kafka-consumer.js:
const { Kafka } = require('kafkajs');

const kafka = new Kafka({ clientId: 'my-app', brokers: ['localhost:9092'] });
const consumer = kafka.consumer({ groupId: 'notification-service' });

async function startConsuming() {
  await consumer.connect();
  await consumer.subscribe({ topic: 'user-events', fromBeginning: true });

  await consumer.run({
    eachMessage: async ({ topic, partition, message }) => {
      const event = JSON.parse(message.value.toString());
      console.log(`Received event:`, event);
      // Do something useful - send email, update DB, etc.
    },
  });
}

startConsuming();
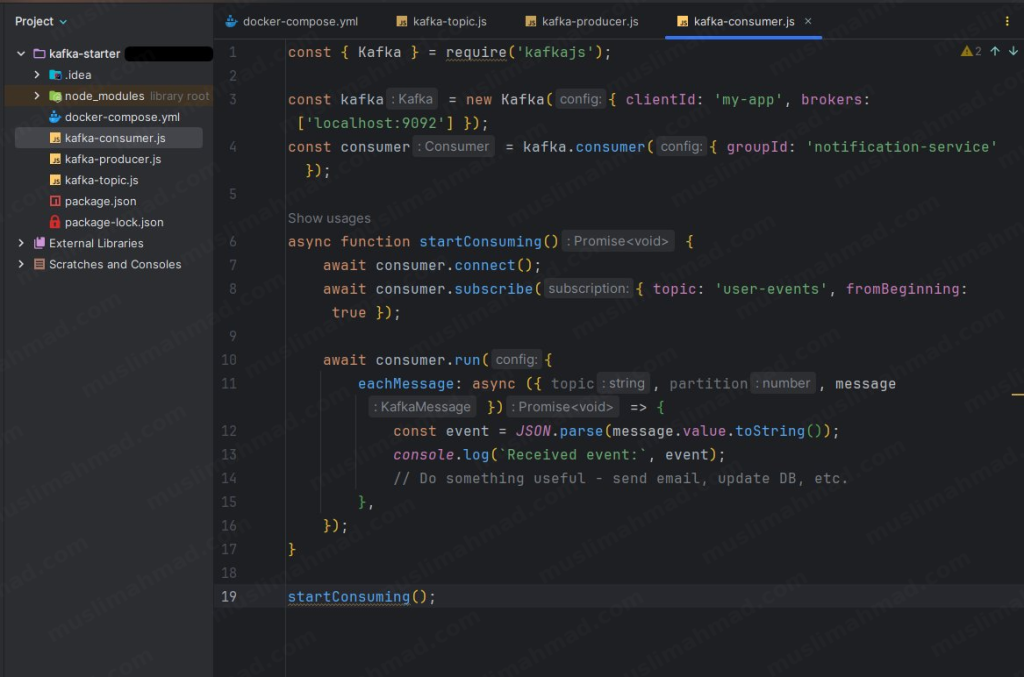
The consumer listens to the user-events topic and logs every message it receives. In a real application, this is where you’d trigger emails, update a database, or notify another service.
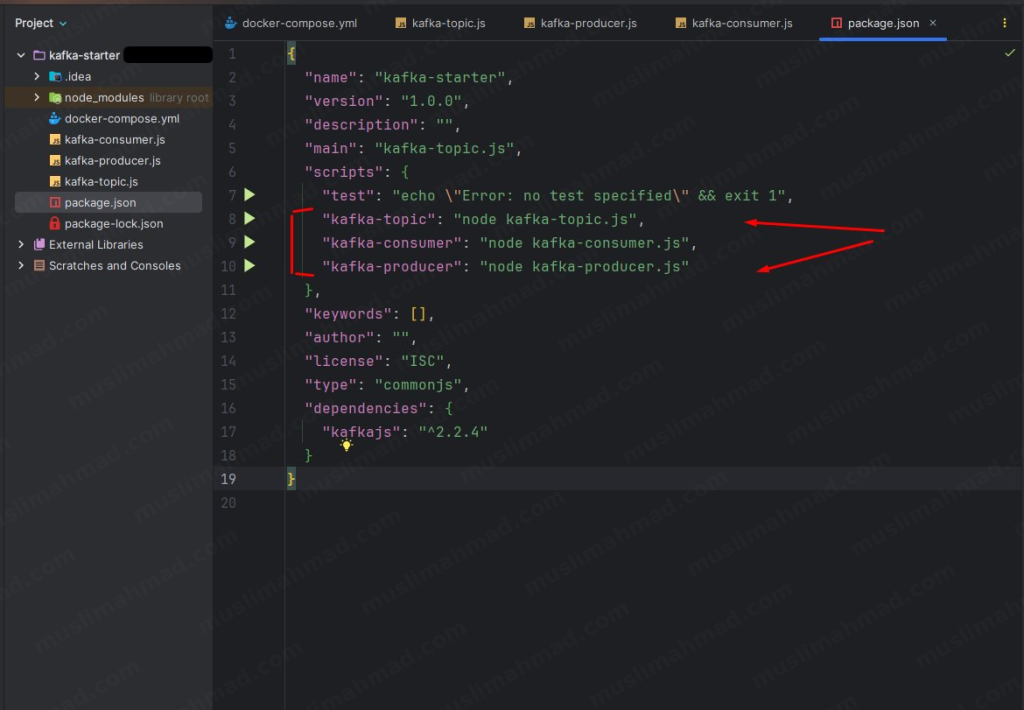
Step 9 – Add npm Scripts
Open your package.json file and add these three scripts so you can run each file easily:
"scripts": {
    "test": "echo \"Error: no test specified\" && exit 1",
    "kafka-topic": "node kafka-topic.js",
    "kafka-consumer": "node kafka-consumer.js",
    "kafka-producer": "node kafka-producer.js"
  },
Step 10 – Run Everything & See It in Action
Now the fun part. Open three separate terminal tabs and run these commands in order.
Terminal 1 – Create the topic first:
npm run kafka-topic
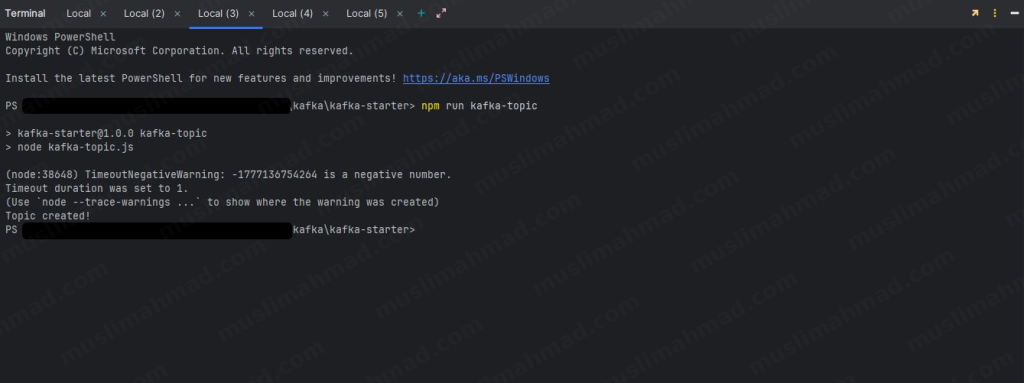
You should see Topic created! in the output.
Terminal 2 – Start the consumer (keep this running):
npm run kafka-consumer
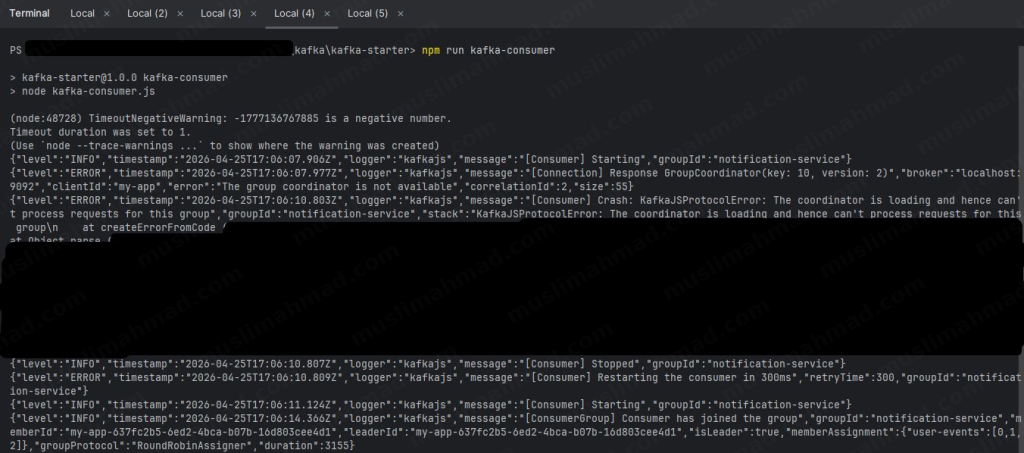
The consumer will start and wait for incoming messages. You’ll notice some initial warnings – that’s completely normal, KafkaJS auto-retries until the coordinator is ready.
Terminal 3 – Fire the producer:
npm run kafka-producer
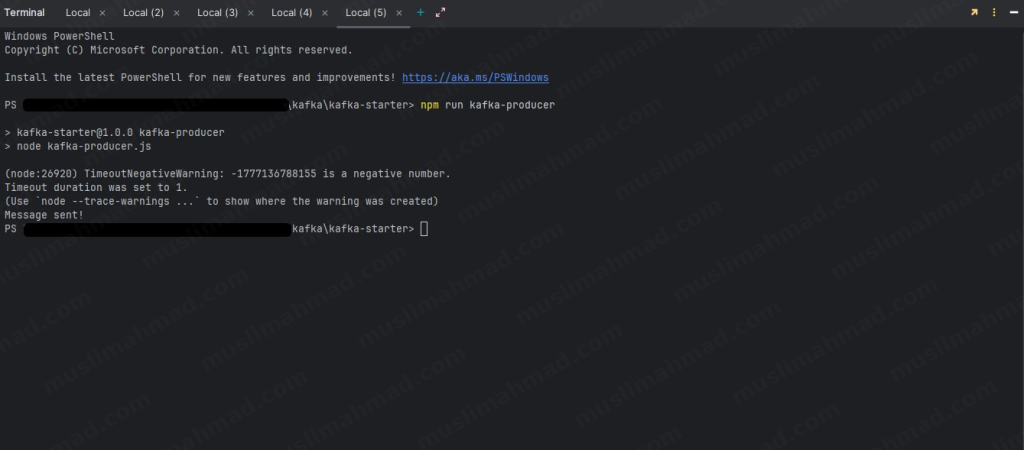
You’ll see Message sent! in this terminal.
Now switch back to Terminal 2 where your consumer is running – you’ll see the event has been received:
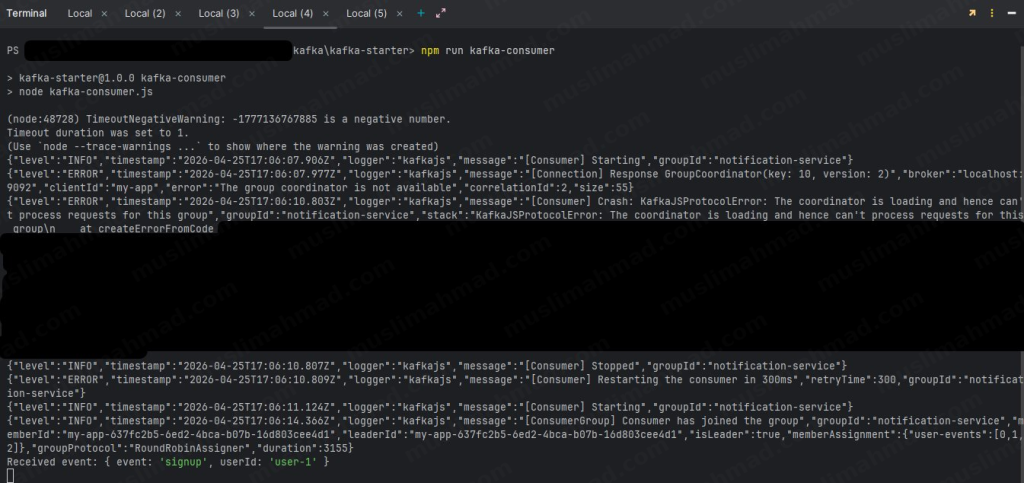
You can see event: ‘signup’ and userId: ‘user-1’ printed in the consumer terminal. That’s the magic of Kafka – your producer sent a message, and your consumer received it in real time. Try changing the values in the producer and run it again – you’ll see a new event appear as a new line in the consumer terminal.
Step 11 – Stop Kafka When Done
When you’re finished, stop the Kafka container cleanly with:
docker-compose down
see:

This removes the container and network. Your code and files stay untouched – just run docker-compose up -d again next time to start fresh.
6. Kafka in Real-World Use Cases
This is where Kafka really shines. Here’s where teams actually use it:
Event Streaming
User actions – clicks, purchases, logins – are streamed in real-time. Downstream services react instantly. This is how Uber tracks your driver’s location every second.
Log Aggregation
Instead of each server writing logs to disk separately, all services push logs to Kafka. A centralized log consumer (like the ELK stack) reads and indexes them. Debugging distributed systems becomes much saner.
Microservices Communication
Services publish domain events (OrderPlaced, PaymentFailed, UserSignedUp) and other services react accordingly. No direct API dependencies, no tight coupling.
Real-time Analytics
Kafka feeds real-time data into analytics pipelines (like Apache Spark or Flink). Think live dashboards, fraud detection, recommendation engines – all powered by streaming data.
7. Kafka vs. Alternatives
“But what about RabbitMQ? Or Redis Streams?” – fair question.
Kafka vs. RabbitMQ
Feature Table – Kafka Vs RabbitMQ
| Feature | Kafka | RabbitMQ |
|---|---|---|
| Message Retention | Yes (configurable) | No (deleted after ack) |
| Throughput | Very High | Moderate |
| Replay Messages | Yes | No |
| Best For | Event streaming, logs | Task queues, simple messaging |
RabbitMQ is great for task queues where you just want a job processed once. Kafka is better when you need durability, replay, and high throughput.
Kafka vs. Redis Streams
Redis Streams is a lighter alternative built into Redis. It’s excellent for smaller-scale use cases where you already use Redis. But for serious data pipelines with millions of events, Kafka is the more battle-tested choice.
When NOT to Use Kafka
Be honest with yourself here. Kafka adds operational complexity. If you’re building a small app with low traffic, a simple job queue (BullMQ, RabbitMQ) will serve you better. Don’t over-engineer.
8. Best Practices & Tips
A few things I wish I knew earlier:
Partition Strategy – More partitions = more parallelism, but also more overhead. A good rule of thumb is to start with 2-3x the number of consumers you expect. Don’t just set 100 partitions thinking it’ll always be faster.
Message Retention Policies – Set retention based on your use case. Time-based ( log.retention.hours=168 for 7 days) works for most scenarios. Size-based retention is better when storage is a constraint.
Use meaningful Message Keys – Keys determine which partition a message goes to. Using a logical key (like userId) ensures all events for the same user land in the same partition, preserving order.
Idempotent Consumers – Always design your consumers to handle duplicate messages gracefully. Network issues can cause a message to be delivered more than once.
Monitor Everything – Keep an eye on consumer lag (how far behind consumers are), broker disk usage, and replication health. Tools like Kafka UI, Confluent Control Center, or Grafana + Prometheus are your friends here.
Official Resources & Documentation
Here are the most important links you should bookmark as you learn Kafka. These are the sources I personally refer to – no fluff, just the essentials:
| Resource | What It’s For | Link |
|---|---|---|
| Apache Kafka Official Site | Main project home, downloads, release notes | kafka.apache.org |
| Official Documentation | Full technical docs – configs, APIs, concepts | kafka.apache.org/documentation |
| Apache Kafka GitHub | Source code, open issues, contributions | github.com/apache/kafka |
| Confluent Developer Hub | Tutorials, guides, best practices | developer.confluent.io |
| KafkaJS (Node.js Library) | The library we use in this blog series | kafka.js.org |
| kafka-python (Python Library) | Python client for Kafka | kafka-python.readthedocs.io |
| Apache Software Foundation | The open-source foundation behind Kafka | apache.org |
If you ever get stuck, the official Kafka documentation is surprisingly readable – it’s one of the better-written docs in the open-source world. The Confluent Developer Hub is also excellent for practical, hands-on tutorials that go beyond the basics.
9. Conclusion: Key Takeaways
If you’ve made it this far, here’s what you should walk away knowing:
- Kafka is a distributed event streaming platform built for high throughput and fault tolerance
- Its core building blocks are Topics, Partitions, Producers, Consumers, and Brokers
- Offsets give consumers full control over what they’ve read and replay capability
- Kafka shines in microservices, real-time analytics, and log aggregation scenarios
- Don’t use Kafka for everything – match the tool to the problem
Kafka has a bit of a learning curve, but once it clicks, you’ll start seeing use cases for it everywhere. Start with the local Docker setup, experiment with producers and consumers, and build something small. That’s the best way to make it stick.
Have questions or want me to dive deeper into any specific topic? Drop a comment below – I read every one.
🕵️☔ Vercel vs Netlify vs Heroku vs Render 🌧️🌐- Serverless Ecosystem 💥🌩️ – Best & Free in 2024 – #20